Creaming Soda Swirl Scones

Creaming Soda Swirl Scones!
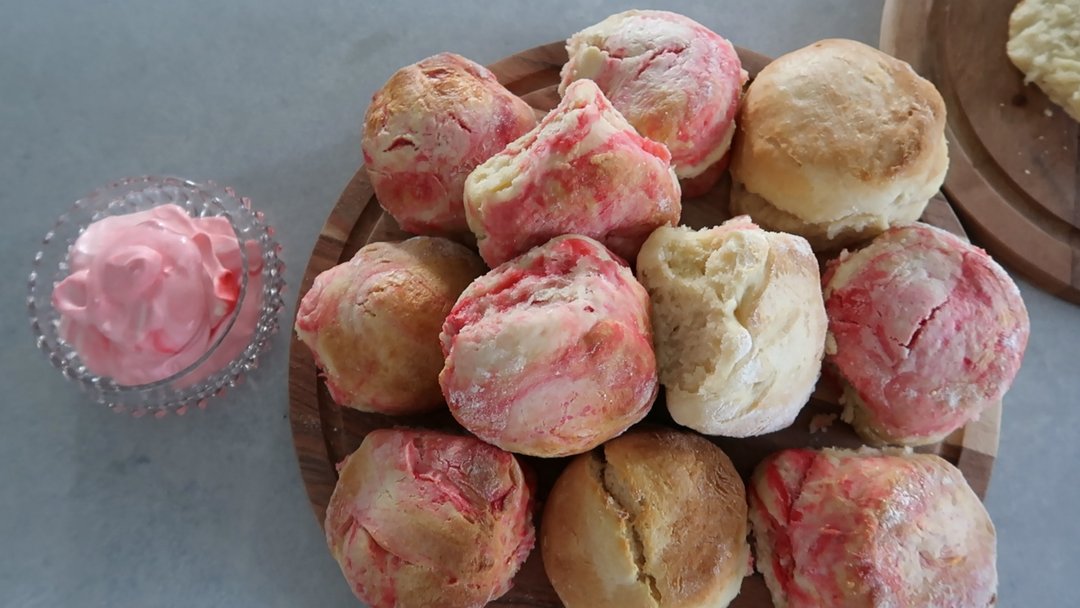
These gorgeous scones are PERFECT for Mother’s Day, a baby shower or just because (they’re THAT good!)

I’m 11/10 happy with how these turned out – they’re stunning and taste even better than they look (and they look pretty damn good!).
This fun creation of mine is incredibly easy to make and packs a punch of color which I love – they turn the humble scone into something magical.

Soft, fluffy, and oh so deliciously marbled with pink!
☀️ RECIPE:
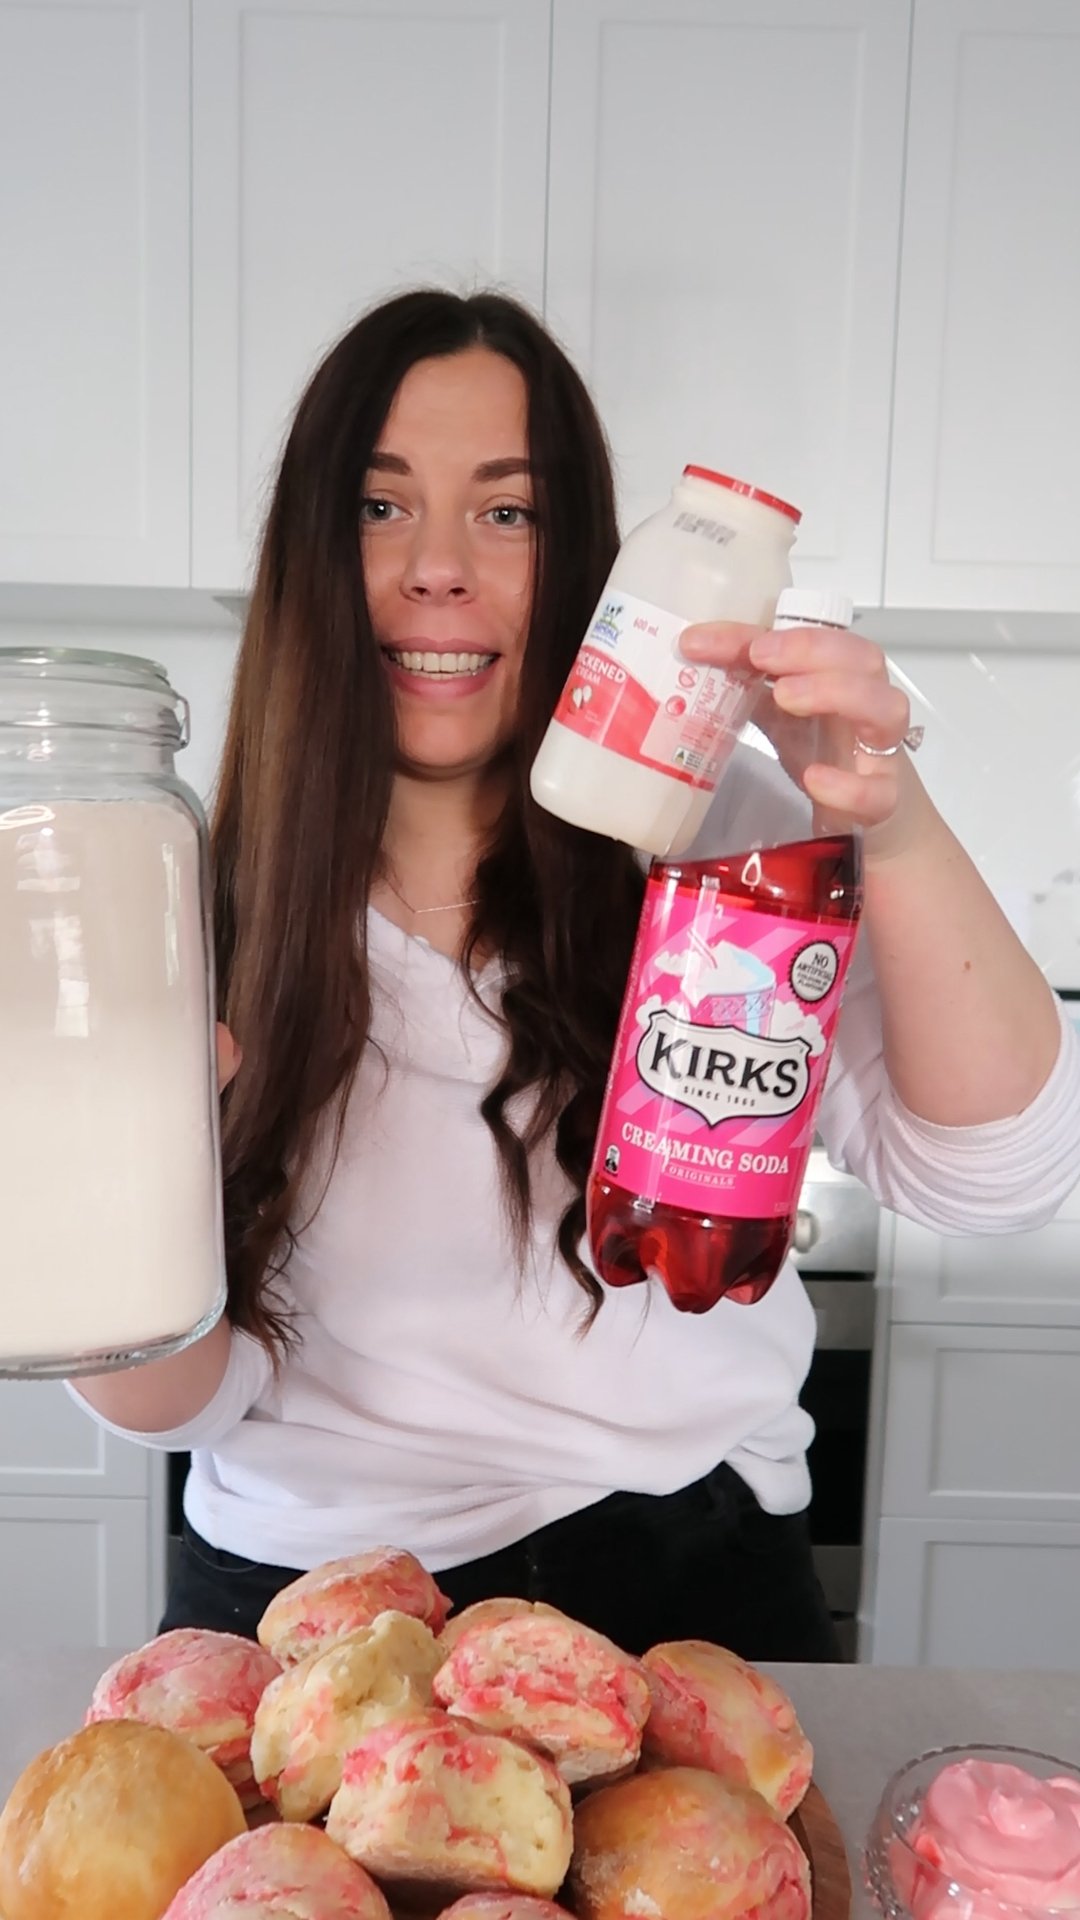
Bowl 1:
✅250 grams Self Raising Flour (2 cups or 8.85 ounces)
✅125 ml Creaming Soda (0.5 cups or 4.25 ounces)
✅150 ml Thickened Cream (0.63 cups or 5 ounces)
✅ (+ a small drop of red food coloring for a more vibrant color!)
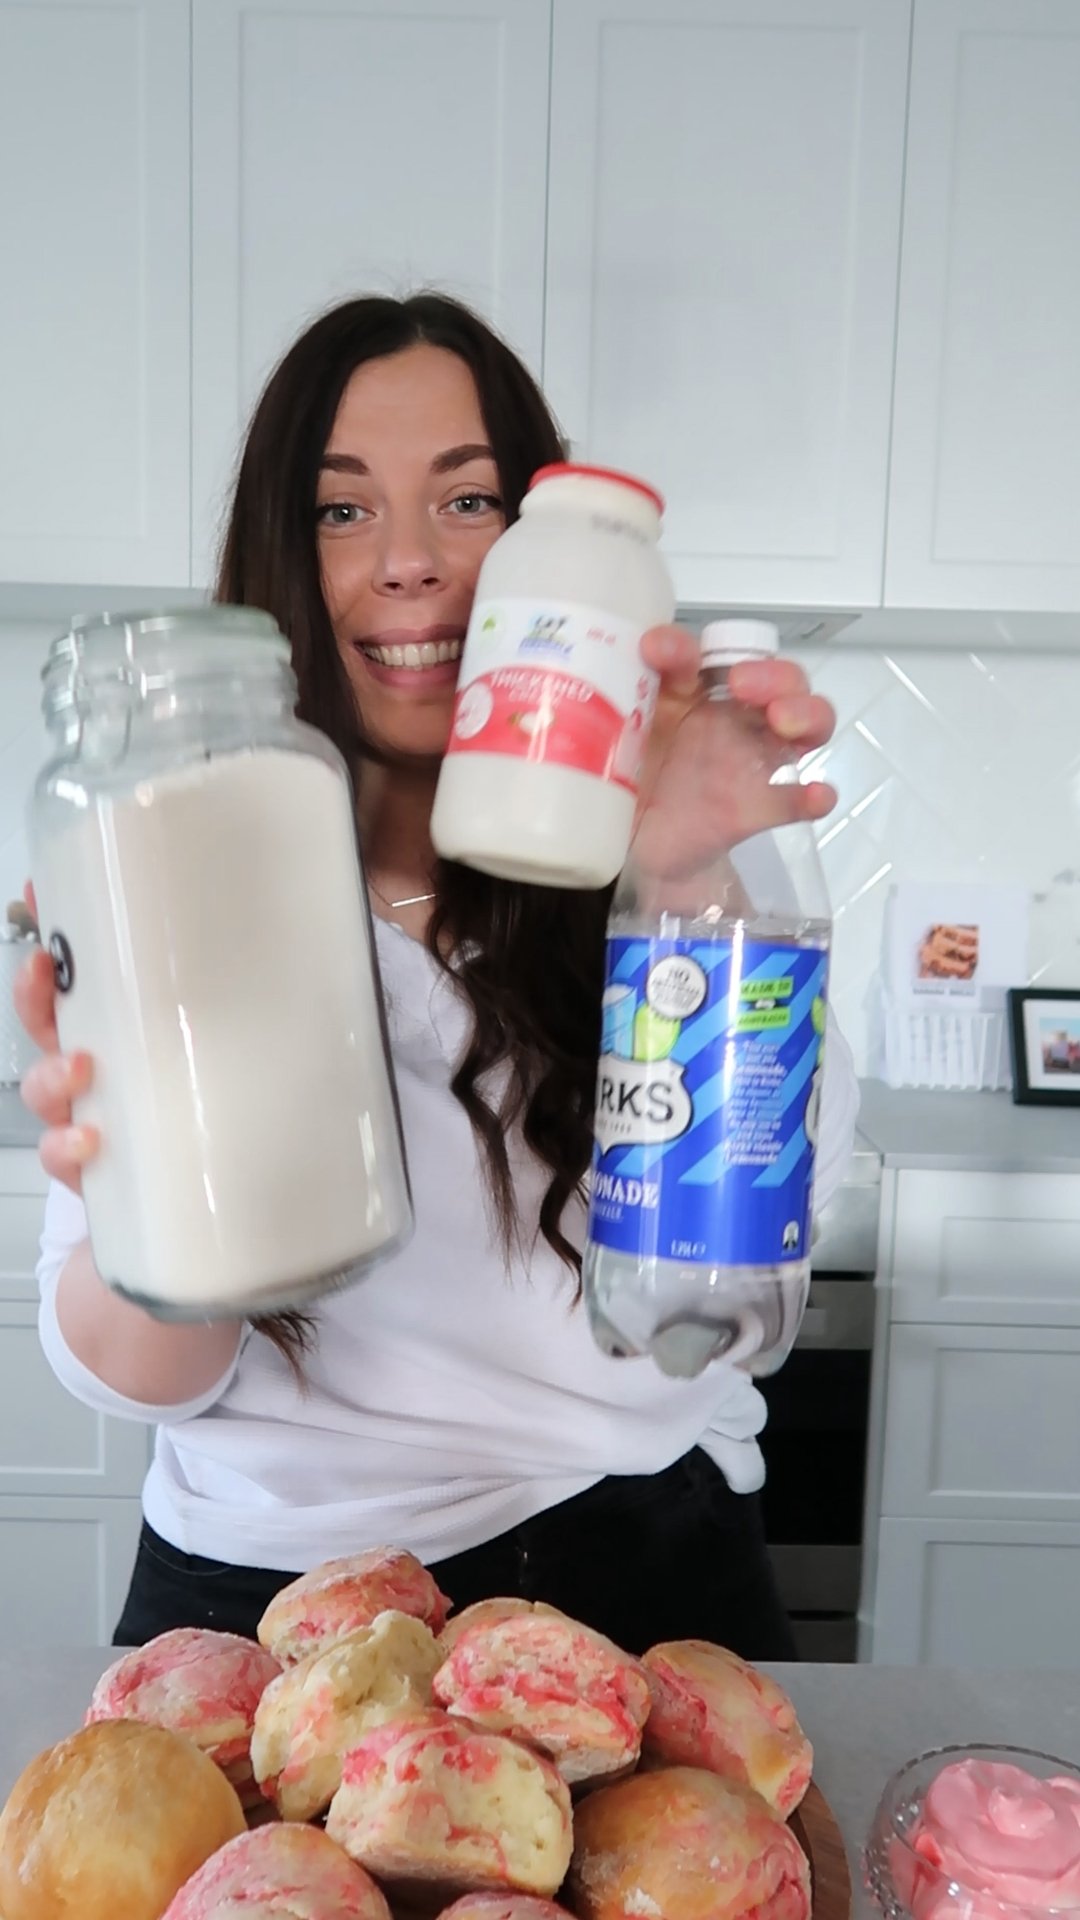
Bowl 2:
✅250 grams Self Raising Flour (2 cups or 8.85 ounces)
✅125 ml Lemonade (0.5 cups or 4.25 ounces)
✅150 ml Thickened Cream (0.63 cups or 5 ounces)
☀️ SPEICAL THINGS YOU’LL NEED:

My wonderful little website is reader-supported and to make things as helpful as possible, I’ve included direct Amazon affiliate links (which means at absolutely no extra cost to you I'll make a small commission if you happen to buy anything that sparks your interest by clicking on my links). Thank you for your support :)
☀️ METHOD:
1. Preheat your oven to 190°C (370°F)
2. In Bowl 1: Stir cream and creaming soda together first, then add self-raising flour (and a drop red/pink food colouring if you want a vibrant color). Mix in a large mixing bowl until just combined (don’t over mix). I love using a Danish Whisk here to make sure I don’t overmix.

2. In Bowl 2: Stir cream and lemonade together first, then add self-raising flour. Mix in a large mixing bowl until just combined (again, don’t over mix or your scones won’t be as light and fluffy).
3. Swirl both scone dough mixes together (until loosely combined) then flour your surface. Using a floured scone or cookie cutter cut them into a scone shape.
4. Place them on a baking tray (try not to touch the ‘sides’ of the scone too much) and bake in the preheated oven for 15 minutes.
Enjoy!

Helpful Notes:
Question: How do I get my scones to rise better? / Mine aren’t as fluffy as I wanted?
Answer: There’s a few things that you can do to get your scones to rise perfectly:
1. Don’t touch the scone ‘sides’ too much (or they won’t rise as well).
2. Make sure not to ‘twist’ the cookie cutter or you’ll smear the sides of the scone (and they won’t rise as well). Just flour your cookie cutter and cut neatly up and down and transfer to the baking tray with as little touching as possible to keep the sides in tact.
3. Flour your cookie cutter between each cut to keep the scone dough from sticking (those sides smearing really do make a big impact on how much a scone rises so try not to smear them).
4. Placing your scones together on the baking tray so they’re juuuuust touching actually helps them all rise a little bit more! When they bake and are close together touching slightly they help eachother to rise by lifting eachother up (AS IF THESE SCONES COULD GET ANY CUTER! <3)
5. Make sure you’re using self-raising flour! Using regular ‘all-purpose flour won’t make these little beauties rise unfortunately so make sure you stick to ‘self-raising flour’.
6. Use fresh fizzy drinks (make sure your lemonade and creaming soda makes that ‘hiss’ noise when you open it to know it’s still got the fizz these scones need to rise up and be as fluffy and soft as can be).

Question: Can I make this Gluten Free instead?
Answer: Yes, feel free to experiment with your choice of gluten free self-raising flour! I’ve made this with gluten free self-raising flour a few times now and the one thing I’d suggest is to eat them the same day!
Don’t pop them in the fridge or they’ll dry out. Scones are always best served right out of the oven but this is REALLY the case for gluten free scones. If you want to make them a little ahead of time then make sure to let them cool completely them pop them in an airtight container and leave it on the counter (again, don’t put them in the fridge or they’ll dry out!).
With gluten free flour there’s always such a difference depending on what kind of gluten free flour/brand you choose but just make sure it’s self-raising gluten free flour and give it a go! I’ve had good success with Aldi’s ‘White Hill’ gluten free self-raising flour.

Question: What is the difference between ‘all purpose flour’ and ‘self-raising flour’?
Answer: All-purpose flour is ‘regular flour’. It’s the flour that is the most common to find and the one most likely already lurking in your kitchen cupboard. It is made from wheat and the basic ingredient for most cooking and baking recipes. Whereas ‘self-raising flour’ is actually flour with baking powder included - which gives it a ‘rising effect’ when cooked (it expands).
This scone recipe uses ‘self-raising flour’ and I’d suggest sticking to this if you can to get the best rise for your scones. Scone dough doesn’t like to be over-mixed so keeping this as simple as possible and sticking to self-raising flour can help your scones rise more (and be extra fluffy).
If you don’t have self-raising flour just make sure to mix all-purpose flour with the baking powder first in a separate bowl (so you don’t over-mix with the wet ingredients).

Question: I don’t like one (or more) of the ingredients in this recipe - can I substitute ingredients out for something else?
Answer: Yes! Feel free. Google is a wonderful resource if you get stuck and don’t know what a good alternative would be to swap something for. For example, head over to Google and type in ‘thickened cream swap’ and you’ll be presented with a range of options to choose from. If you’re still stuck, feel free to reach out to me on Instagram and I’ll do my very best at finding you a good alternative suggestion for ingredient swaps!

Question: What is Thickened Cream?
Answer: Thickened Cream is a type of common cream used in baking which has 35% milk fat and thickening agents added such as gelatin or vegetable gum (which makes it easier to whip and less likely to separate or curdle in baking).
Thickened Cream is a very common cream used here in Australia but it might go by another name in your country. Google is your best friend here :)
If in doubt you can read the fat content on the label to see which is which. Single cream (often labelled “pouring cream”) contains 33-35% fat, double cream has 60-66% fat, and thickened cream is single cream with a thickening agent added. Thickened cream typically refers to cream that has stabilizers added, like gelatin or agar for example, to help it hold shape when whipped.

Question: Did your doggo get to nom any scones?
Answer: Haha although she didn’t eat any scones (because they’re not dog-safe) she did get to lick the cream-only beaters :D She was one happy pup!
Question: What toppings do you recommend for these scones?
Answer: Jam and cream are wonderful for topping scones :) Strawberry is a fantastic addition to this playfully pink scone – but blueberry, raspberry or apricot are good shouts too! I’ve even eaten these creaming soda swirl scones with just cream and a tiny bit of red dye (for a fun colour) because I actually forgot to get jam and realised the stores were shut just as I finished baking them. Even plain, these are incredible (but jam + cream on scones if the ultimate combo :)

Question: How do I store these/how long will they last?
Answer: Scones are delicate and always best served on the day you bake them. But they can last 2 days in an airtight container (at room temperature) before loosing their quality.

Connect With Me!
If you enjoyed this recipe, have any questions or want to chat, feel free to connect with me on Instagram @connorcarbonara! I’d love to hear from you!

Nutritional Info:
Counting calories and tracking macros works well for some people but for many others it can lead to obsessive tracking behaviours/disordered eating patterns (and often does more harm than good) - so I’ve made the personal decision to not post them because I never want my recipes to play a role or influence someone into unnecessary tracking/unhealthy views about food and calorie counting. I believe food is one of the best things this world has to offer and hope my recipes inspire you to get creative, have fun, and enjoy life to the fullest (surrounded by incredible food)!